There is a very specific moment where git stops making sense. You know add, commit, push. Then someone says “just fork the repo, set upstream, rebase your branch onto main and open a PR.” You nod. You have no idea what any of that means.
That is what this covers. Not a full git textbook, not a list of every flag. Just the things you will actually hit in real work, explained in a way that makes them click. If you are reading this with zero experience, that is fine. Start from the top and go section by section. Everything builds on what came before.
the mental model (actually important, takes 2 minutes)
Before running a single command, this is the one concept worth getting right.
Git does not track changes the way most people imagine. It does not store a list of edits like “you added line 5 and deleted line 12.” Instead, it stores snapshots. Every commit is a complete picture of your entire project at that exact moment. This is why switching between commits is instant, why branching costs almost nothing, and why certain undo operations behave the way they do.
Three places your code can live at any point in time:
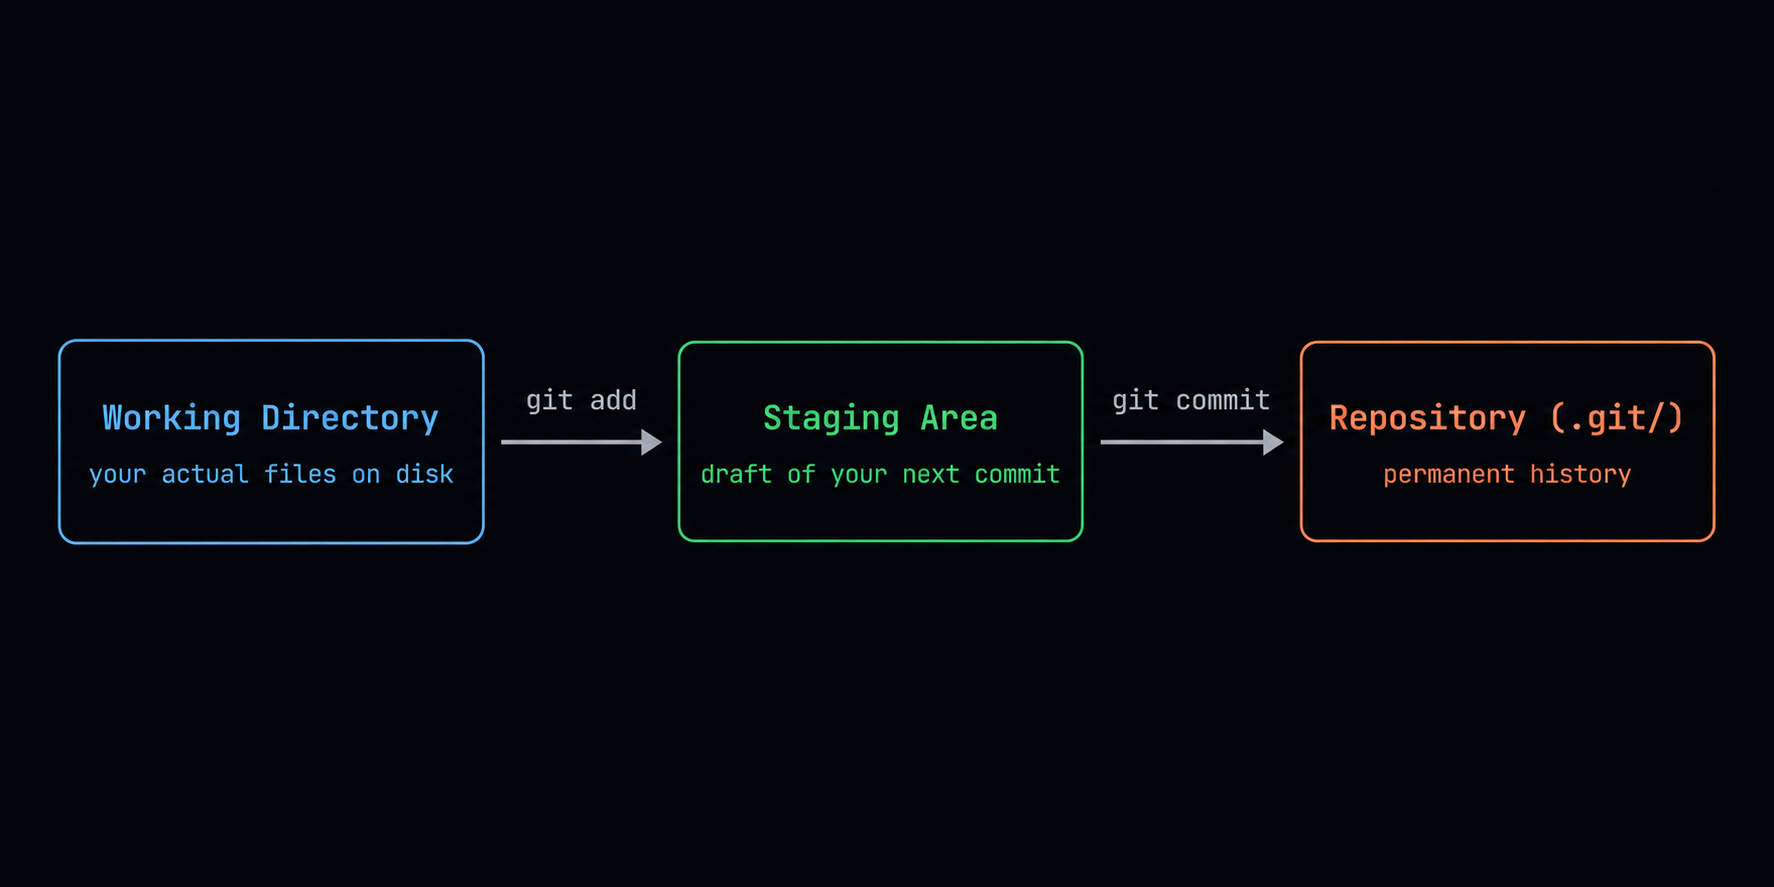
Every single git command either moves data between these three areas or reads from them. Once you internalize this, the output of git status becomes completely readable without guessing.
setup (do this once before anything else)
Before you can use git, it needs to know who you are. Every commit you make will be stamped with this name and email, so use something real.
$ git config --global user.name "Your Name"
$ git config --global user.email "you@example.com"
$ git config --global core.editor nano # nano is safest for beginners # other options: nvim, "code --wait"
$ git config --global init.defaultBranch main
$ git config --global alias.lg "log --oneline --graph --all --decorate"
# check everything that got set
$ git config --global --list
That alias.lg line is worth its weight. Instead of a wall of text when you run git log, running git lg gives you a visual tree of your branches and commits. You will use it constantly once you have it.
A quick note on editors: if you are just starting out, set it to nano. If you accidentally end up in vim without setting this, type :q! and press enter to escape.
- Run each config command above in your terminal, replacing the name and email with your own.
- Run
git config --global --listand confirm your name, email, and editor appear in the output. - Create a test folder anywhere:
mkdir git-practice && cd git-practice - Run
git initand thengit lg-- you will see an empty result, which is fine. The alias is working.
starting a repo
Two situations: starting fresh, or working with an existing project.
$ mkdir my-project && cd my-project
$ git init
# this creates a hidden .git/ folder inside your project # that folder is git. it contains your entire history. # delete .git/ and all git tracking vanishes. your files stay.
# --- getting someone else's project ---
$ git clone https://github.com/username/repo.git
$ git clone https://github.com/username/repo.git my-folder-name # custom folder name
When you clone, git automatically saves the source URL under the nickname origin. That is all a “remote” is: a saved URL with a name you can refer to later. We will come back to remotes in detail.
- Create a new folder called
hello-gitand navigate into it. - Run
git init. - Run
ls -la(on Mac/Linux) ordir /a(on Windows) and confirm you see a.gitfolder. - Create a file:
echo "hello world" > readme.txt - Run
git statusand read the output carefully. You should seereadme.txtlisted as an untracked file.
the daily cycle
This is what you will do every single time you work on a project. Get comfortable with this loop before moving on.
$ git status # always start here. always.
$ git add index.html # stage one specific file
$ git add src/ # stage everything in a folder
$ git add . # stage every changed file from here down
$ git add -p # stage piece by piece, hunk by hunk (powerful)
$ git commit -m "add login page"
$ git push
git add -p is worth learning even as a beginner, even though most tutorials skip it. It walks you through each changed section of each file and asks what to do with it. The options are:
yto stage this chunknto skip itsto split it into smaller piecesqto quit
This matters when you have changed two unrelated things in the same file and want to put them in separate commits. Commits should be focused and logical, not just “everything I changed today.”
Writing good commit messages. A helpful rule: your commit message should complete this sentence: “If applied, this commit will ___”. Keep the first line under 72 characters. Many open source projects use a prefix format like feat:, fix:, docs:, refactor:, chore:. It is not required everywhere but it is a good habit that makes history readable.
Good: fix: prevent crash when user email is empty
Bad: stuff or fix or asdfgh
reading git status output
$ git status
Changes to be committed: # staged. will go into your next commit.
new file: login.html
Changes not staged for commit: # modified but not yet staged.
modified: index.html
Untracked files: # git sees these files but is not tracking them.
notes.txt
One thing that trips people up: the same file can appear in both “to be committed” and “not staged” at once. This happens when you stage a file, then edit it again. Staging takes a snapshot of the file at that exact moment. The newer edit is sitting in your working directory as a separate version that has not been staged yet. Run git add on it again to capture the latest version.
looking at history and differences
$ git log --oneline # compact commit list
$ git lg # your alias: visual branch tree (use this)
$ git diff # what changed but is NOT staged yet
$ git diff --staged # what IS staged (what will go into the next commit)
$ git diff HEAD~1 HEAD # compare the last two commits
$ git show HEAD # full diff of the latest commit
$ git show abc1234:style.css # see a file exactly as it was at any commit
$ git log -S "functionName" # find when a specific string appeared or disappeared
HEAD just means “wherever you are right now.” Think of it as a bookmark. HEAD~1 is one commit behind your current position, HEAD~3 is three back. The tilde means “go back this many commits.”
git log -S is called the pickaxe search and most people never discover it. It searches your entire project history for commits that added or removed a specific string. When something breaks and you have no idea which commit caused it, this is often the fastest way to find out.
- Inside your
hello-gitfolder, create two files:index.htmlandstyle.css. - Run
git statusand confirm both show as untracked. - Stage only
index.htmlwithgit add index.html. - Run
git statusagain. Notice thatindex.htmlis staged andstyle.cssis still untracked. Two different states in the same status output. - Commit with a good message:
git commit -m "feat: add initial html structure" - Now stage and commit
style.cssseparately. - Run
git lgand see your two commits in the tree.
.gitignore
Some files should never go into your git history. Dependencies (like node_modules/) are huge and can be reinstalled. Build output can be regenerated. And API keys should never, ever be committed.
The .gitignore file tells git which files and folders to completely ignore.
node_modules/
.venv/
__pycache__/
# build output (generated automatically)
dist/
build/
*.pyc
# secrets. NEVER commit these.
.env
.env.local
.env.*.local
# OS and editor clutter
.DS_Store
*.swp
*.log
.env.example file with fake placeholder values so teammates know what variables the project needs, but never the real values.There is one important rule about .gitignore: it only works on files that are not yet tracked by git. If a file was already committed once, adding it to .gitignore does nothing. You need to explicitly tell git to stop tracking it:
$ git rm --cached .env # stop tracking this file, but keep it on disk
$ git rm -r --cached node_modules/ # same thing for a whole directory
# after running these, add the file to .gitignore and then commit
The --cached flag is the key part. Without it, git rm deletes the file from your disk too. With it, git removes the file from tracking but leaves your actual file alone.
github.com/github/gitignore. When starting a new project, grab the right template from there instead of writing one from scratch.branches
A branch is just a pointer to a commit. Nothing more. When you create a branch, git creates a new pointer. When you commit on that branch, the pointer moves forward to your new commit. No files are duplicated. No folders are copied. Branching is fast because it is literally just creating a small file that contains a commit hash.
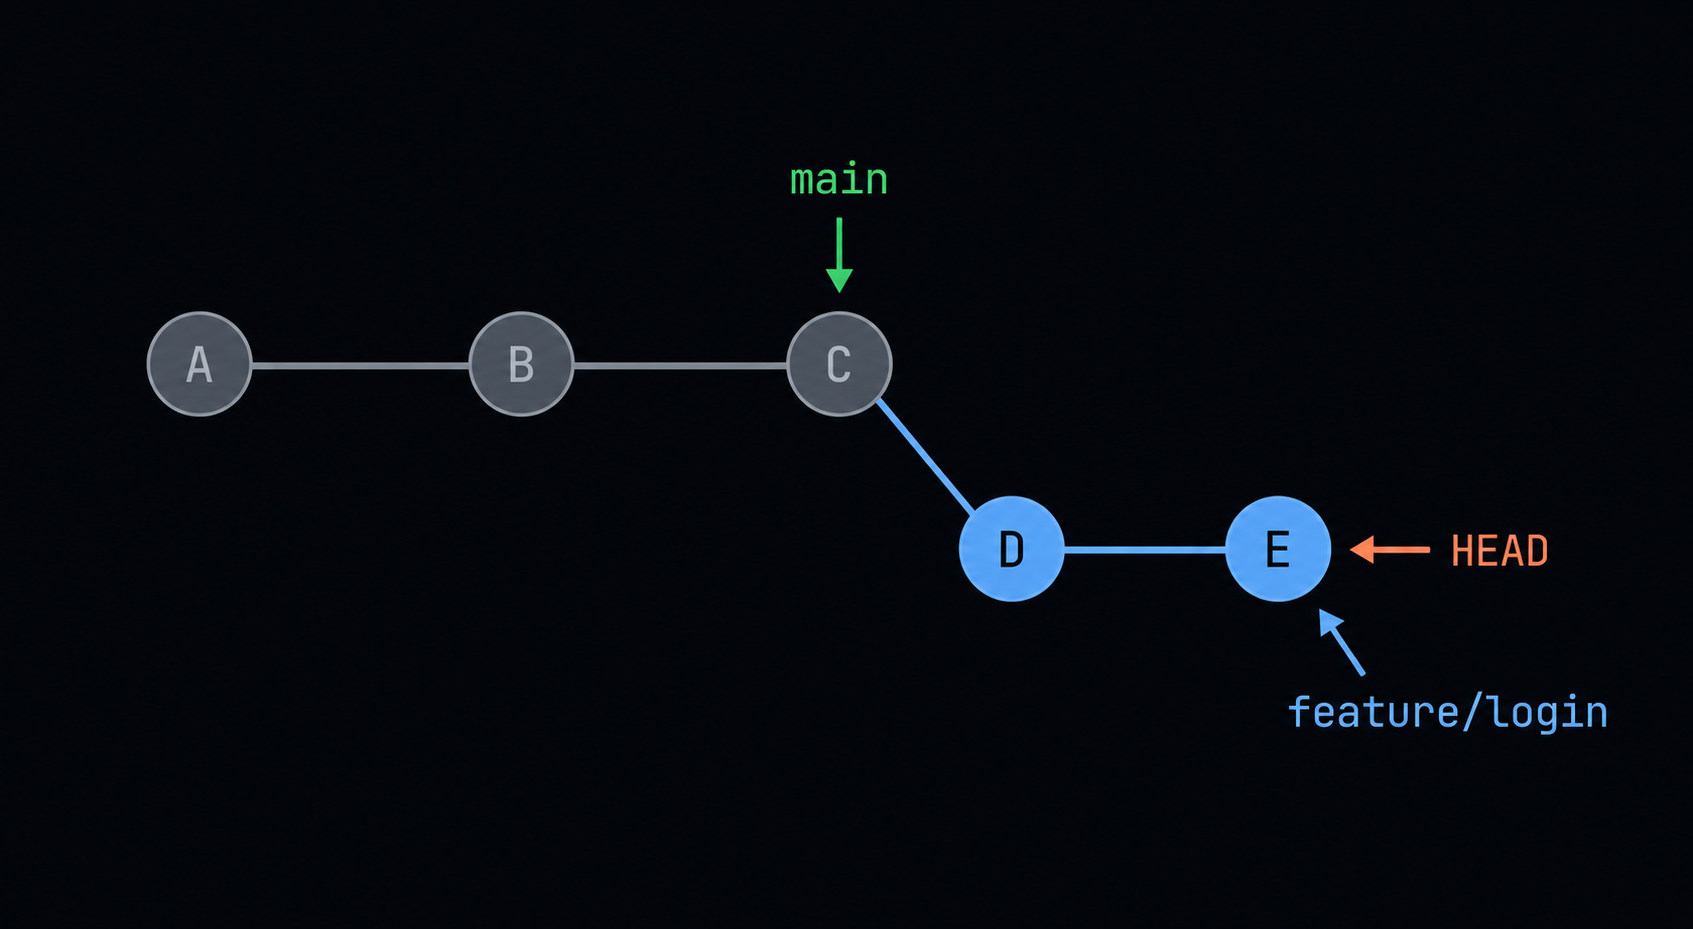
HEAD is a pointer to whatever branch you are currently on. When you make a commit, your current branch moves forward. When you switch branches, HEAD just points somewhere else.
$ git branch # list all local branches
$ git branch -a # list local AND remote branches
$ git switch -c feature/login # create a new branch and switch to it
$ git switch main # switch to an existing branch
$ git branch -d feature/login # delete a branch (only after merging)
$ git branch -D feature/login # force delete even if not merged
$ git branch -vv # see branches with tracking info and ahead/behind status
git switch is the modern command for changing branches. Older tutorials use git checkout for this and it works fine, but checkout does way too many different things depending on what arguments you pass it. switch is clearer and was introduced specifically to replace that part of checkout.
When to branch: always. For every feature, every bug fix, every experiment. Main should only ever hold working, stable code. All actual development happens on branches. This is not just team etiquette. It protects your own work from yourself. You can experiment freely on a branch, and if it goes wrong you just delete it.
A good naming convention for branches:
feature/user-authenticationfix/crash-on-empty-formdocs/update-readmechore/upgrade-dependencies
- Inside your practice repo, create a new branch:
git switch -c feature/about-page - Run
git branchand confirm you are now on the new branch (it will have a * next to it). - Create a file called
about.htmland add some text to it. - Stage and commit it:
git add about.html && git commit -m "feat: add about page" - Switch back to main:
git switch main - Run
ls(ordiron Windows). Notice thatabout.htmlis gone from your folder. It exists on the feature branch, not on main. This is how branches work. - Run
git lgand see the branch structure visually.
merging and merge conflicts
When your feature branch is ready, you bring it back into main:
$ git switch main
$ git merge feature/login
There are two possible outcomes when merging:
Fast-forward merge: If main has not had any new commits since you branched off it, git simply slides the main pointer forward to your branch’s tip. Clean, simple, no extra commit created.
Merge commit: If main has new commits that your branch does not have, git creates a new “merge commit” that has two parents, one from each branch. This commit records where the two lines of work came back together. It looks slightly messier in history but it is totally normal and fine.
when conflicts happen
A conflict happens when both branches changed the same lines of the same file in different ways. Git cannot decide which version to keep, so it stops and asks you to decide.
$ git merge feature/login
CONFLICT (content): Merge conflict in index.html
Automatic merge failed; fix conflicts and then commit the result.
Open the file in your editor and you will see markers that git inserted:
Reading this:
- Everything between
<<<<<<< HEADand=======is your current branch’s version - Everything between
=======and>>>>>>>is what is coming in from the branch you are merging
You decide what the final result should look like. Maybe you want one version, maybe the other, maybe a combination. Edit the file to exactly what you want, then delete all the conflict markers (the <<<<<<<, =======, and >>>>>>> lines). Save the file, then:
$ git add index.html # tell git the conflict in this file is resolved
$ git commit # git will pre-fill a merge commit message for you
# changed your mind and want to abandon the whole merge:
$ git merge --abort # resets everything back to before you ran merge
- On main, edit
readme.txtto say "version from main" and commit it. - Create a new branch:
git switch -c conflict-test - Edit the same
readme.txtto say "version from branch" and commit it. - Switch back to main:
git switch main - Run
git merge conflict-test. You will get a conflict. - Open the file, read the markers, decide what to keep, remove all markers.
- Stage the file and commit. Conflict resolved.
remotes: origin, upstream, and what they actually are
This section trips people up more than almost anything else in git. Read it carefully.
A remote is nothing more than a saved URL with a nickname. That is the entire concept. When you clone a repo, git saves the source URL under the name origin automatically. You can add more remotes, rename them, or remove them whenever you want. There is nothing magical about the names “origin” or “upstream,” they are just the conventions people follow.
$ git remote -v
origin git@github.com:you/repo.git (fetch)
origin git@github.com:you/repo.git (push)
# add a new remote with a name
$ git remote add upstream git@github.com:original/repo.git
# remove a remote
$ git remote remove upstream
# change the URL of an existing remote
$ git remote set-url origin git@github.com:you/new-repo.git
Now the four commands that move code between local and remote:
git push sends your local commits up to the remote. Nothing on the remote changes until you push.
git fetch downloads new commits from the remote but does NOT touch any of your local branches. You are just downloading information. Safe to run anytime.
git pull is fetch plus merge in one step. Downloads new commits and immediately merges them into your current branch.
git pull --rebase is fetch plus rebase. Downloads new commits and replays your local commits on top of them. Usually produces cleaner history than a regular pull.
$ git push origin main
$ git push origin feature/login
$ git push -u origin feature/login # -u sets up tracking between local and remote branch # after this, plain "git push" works without arguments
$ git push --delete origin old-branch # delete a remote branch
# fetching and pulling
$ git fetch origin # download from origin, touch nothing local
$ git fetch --all # download from every remote you have
$ git pull # fetch + merge
$ git pull --rebase # fetch + rebase (cleaner, prefer this)
The -u flag on git push sets up tracking. It links your local branch to the corresponding remote branch so git knows the relationship. You only need to do this once per branch. After that, git push and git pull with no arguments will know where to go.
SSH setup (stop typing passwords forever)
HTTPS authentication works, but every push requires typing your username and password or a personal access token. SSH keys fix this permanently. You generate a key pair, give GitHub your public key, and everything authenticates silently from then on.
$ ssh-keygen -t ed25519 -C "you@example.com"
# press enter to accept the default save location (~/.ssh/id_ed25519) # optionally add a passphrase for extra security, or just press enter for none
# step 2: print your PUBLIC key and copy the entire output
$ cat ~/.ssh/id_ed25519.pub
# step 3: go to GitHub in your browser # Settings → SSH and GPG Keys → New SSH Key → paste → Save
# step 4: test that it works
$ ssh -T git@github.com
Hi username! You've successfully authenticated...
# step 5: if an existing repo uses HTTPS, switch it to SSH
$ git remote set-url origin git@github.com:username/repo.git
The key pair works like a lock and key. Your private key (id_ed25519, no .pub) stays on your machine and you never share it with anyone. The public key (id_ed25519.pub) is what you paste into GitHub. When you connect, GitHub uses the public key to verify that you have the matching private key, without you ever sending the private key over the network.
After this is set up, always clone using SSH URLs (git@github.com:user/repo.git) instead of HTTPS URLs.
forking and contributing to open source
This is the workflow that most beginners want to learn but find confusing. It will make complete sense by the end of this section.
When you want to contribute to a project you do not own, you cannot push directly to it. You need to fork it first. Forking creates a full copy of the repo under your own GitHub account. You have complete push access to your fork. You make your changes there, then open a pull request asking the original project to pull your changes in.
By convention:
- The original repo that you do not own is called upstream
- Your fork on GitHub is called origin
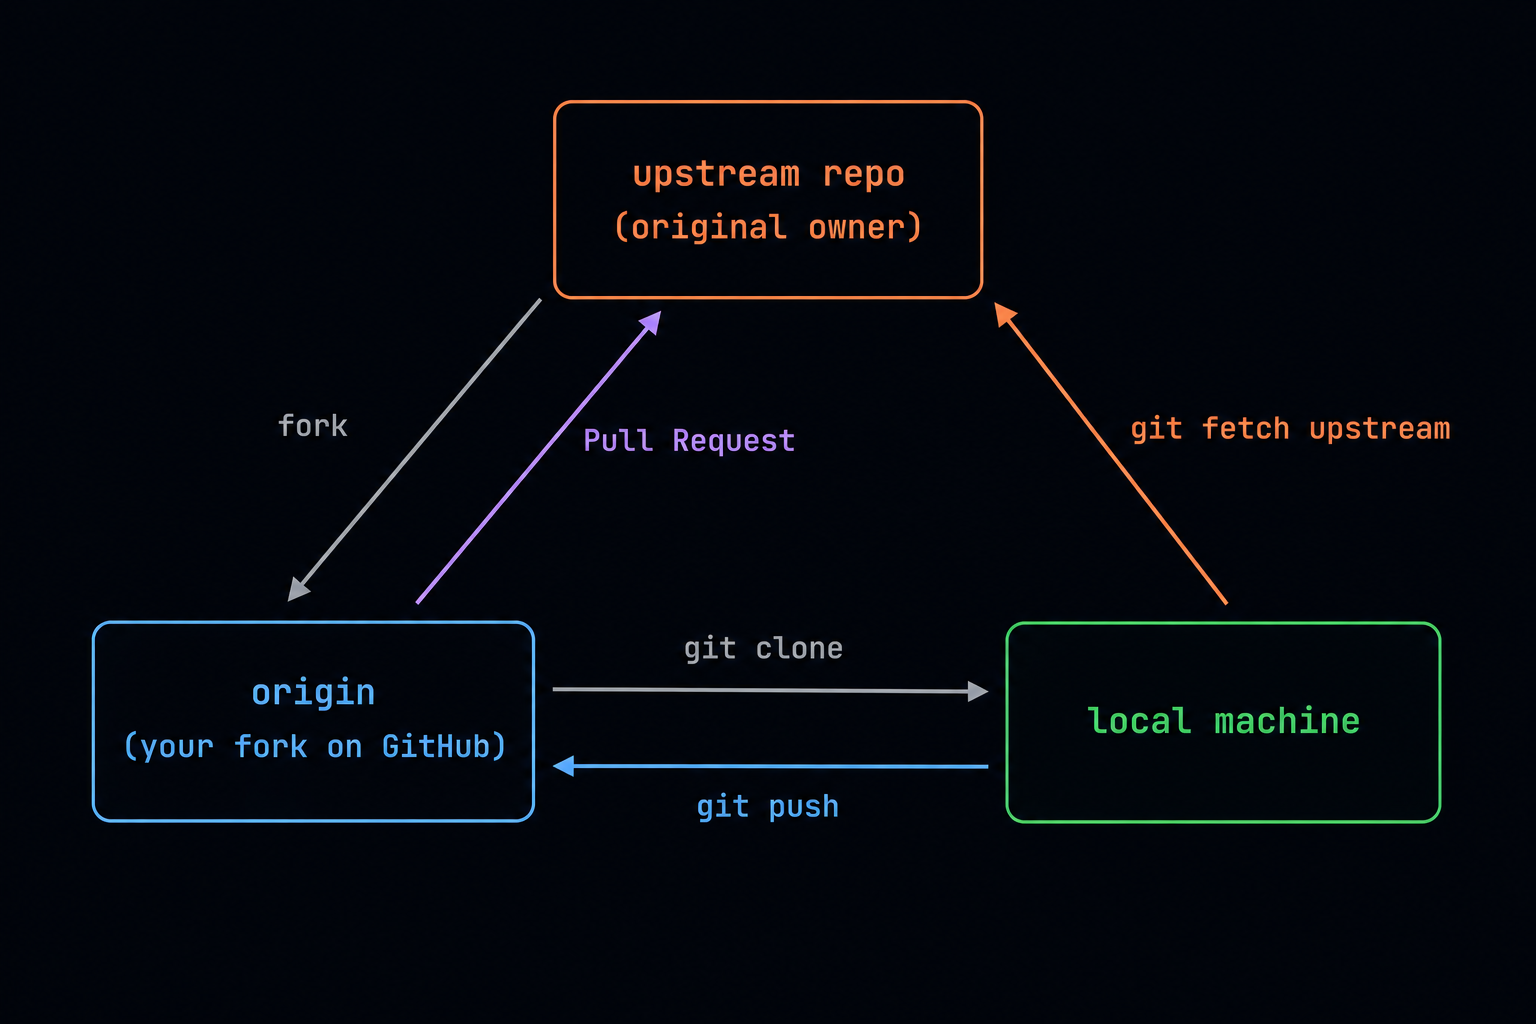
- Go to the repo on GitHub. Click Fork in the top right. GitHub creates
your-username/repounder your account. - Clone your fork to your machine:
git clone git@github.com:your-username/repo.git && cd repo - Add the original repo as a second remote named upstream:
git remote add upstream git@github.com:original-owner/repo.git - Verify both remotes exist:
git remote -vshould show both origin and upstream entries. - Create a branch for your specific change:
git switch -c fix/typo-in-readme - Make your changes, stage them, commit with a clear message.
- Push your branch to your fork:
git push -u origin fix/typo-in-readme - Go to GitHub. You will see a yellow banner asking if you want to open a pull request from your recently pushed branch. Click it.
- Write a description explaining what you changed and why, then submit the PR.
keeping your fork up to date
After you fork a project, the original keeps getting new commits from other contributors. Before starting any new work, sync your local main with upstream first so you are not working from outdated code:
$ git switch main
$ git fetch upstream
$ git merge upstream/main # bring upstream changes into your local main
$ git push origin main # update your fork on GitHub too
Then branch off that updated main for your new work. Make syncing with upstream a habit every time you sit down to work on an open source project.
pull requests in more detail
A pull request is a proposal to merge your branch into someone else’s branch. When you open one on GitHub, the PR page shows all your commits, the full diff of every file you changed, and a discussion thread.
Reviewers can leave comments on specific lines of code. You push new commits to the same branch and they appear in the PR automatically. No need to close and reopen anything. When a reviewer approves, someone with merge access clicks the merge button.
CONTRIBUTING.md file before writing a single line of code. it tells you exactly how they want contributions structured, what tests to run, and what to put in your PR description.- Go to
github.com/firstcontributions/first-contributions. This repo exists specifically for practicing the fork workflow with no risk. - Fork it to your account.
- Clone your fork to your machine.
- Add the original as upstream.
- Create a branch, add your name to the contributors list as the README instructs.
- Push and open a pull request. Real maintainers will merge it.
rebase
Rebase is the concept that confuses the most people, but it is actually straightforward once you see what it is doing.
Rebase takes your commits and replays them one by one on top of a different starting point. The most common use case is updating a feature branch that has fallen behind main.
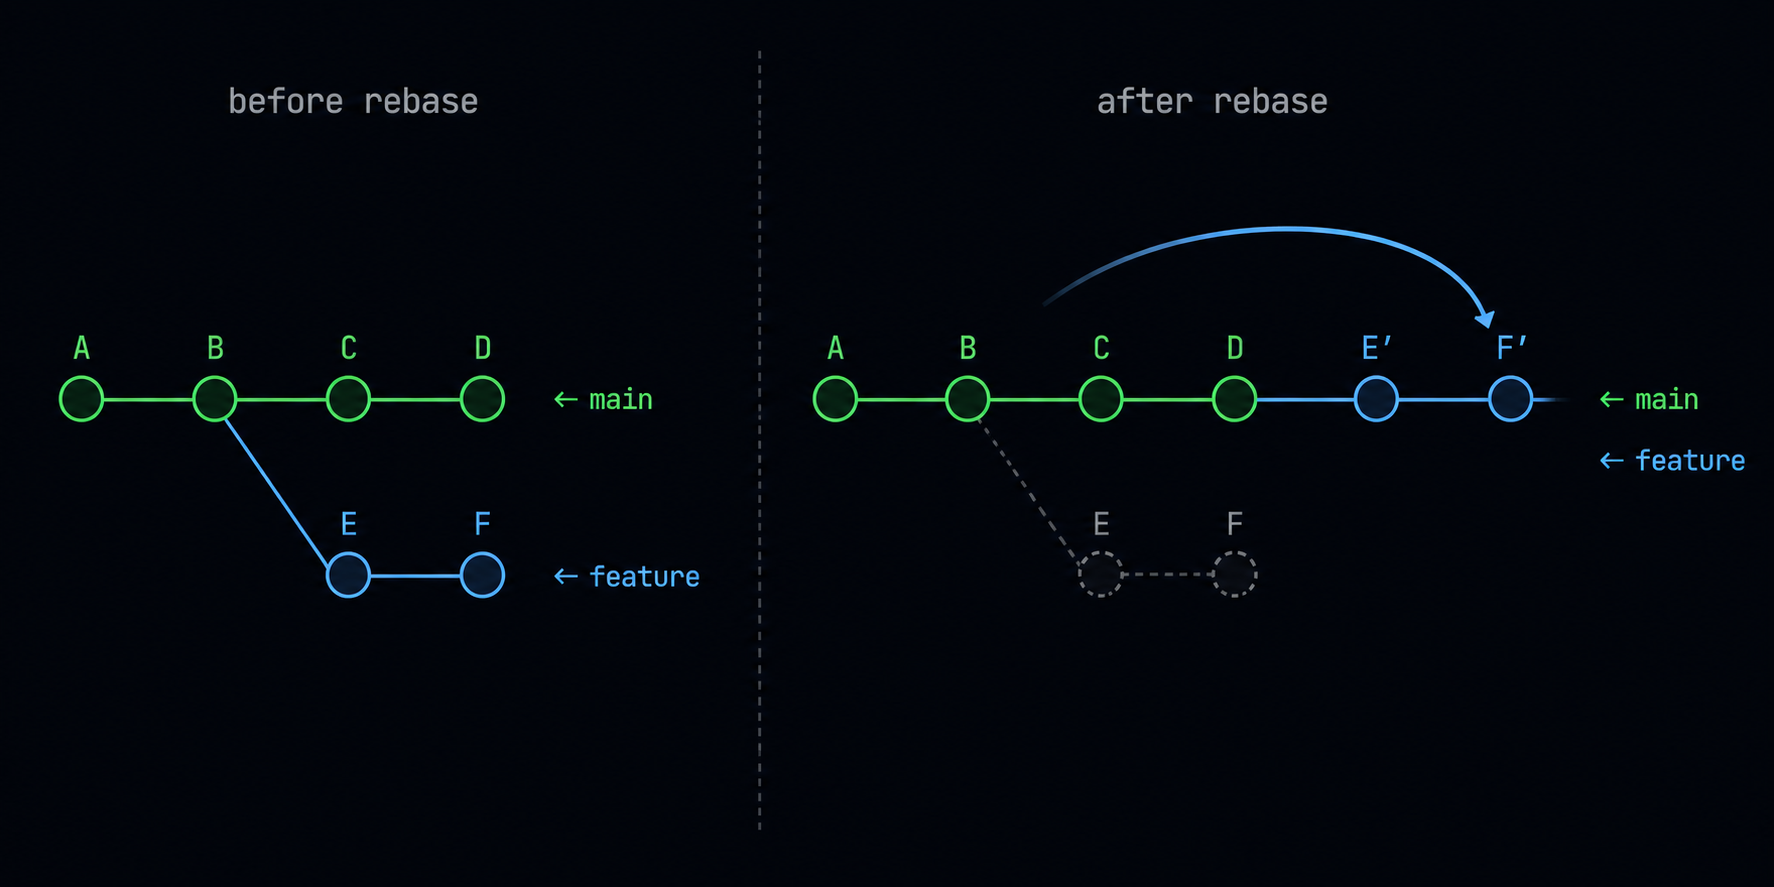
E’ and F’ are brand new commit objects with the same changes as E and F, but now applied on top of D instead of B. The history looks as if you had started your branch from the latest main all along. Linear and clean.
$ git switch feature/my-thing
$ git fetch upstream
$ git rebase upstream/main
# if a conflict shows up during rebase: # 1. open the file, fix the conflict, delete the markers
$ git add .
$ git rebase --continue # move on to replaying the next commit
# if you want to completely cancel and go back to before:
$ git rebase --abort # puts everything back exactly as it was
# after a successful rebase, the branch history was rewritten # so you need to force push (safely)
$ git push --force-with-lease origin feature/my-thing
--force-with-lease instead of -f or --force. The difference is important. -f overwrites the remote branch blindly no matter what. --force-with-lease checks first whether someone else pushed to the branch since your last fetch, and refuses to proceed if they did. It protects you from overwriting other people's work. Never force push to main or any branch that multiple people are actively working on.Rebase vs merge, when to use which: Use rebase to update your own feature branches and keep history linear. Use merge when combining shared branches where multiple people have committed, because rewriting shared history breaks everyone else’s local references.
interactive rebase: cleaning up messy commits
You have been working on something for a few days and have seven commits with messages like “wip”, “fix”, “fix again”, “ok this time”. Before opening a pull request, clean them up:
$ git rebase -i HEAD~4 # open an editor to edit the last 4 commits
Your editor opens with the commits listed oldest first:
pick 3f7a2c1 add login form
pick 9a1b3e2 fix typo
pick c4d5e6f add validation
pick 7f8a9b0 wip
# change the word "pick" to one of these actions:
# s or squash -- combine into the previous commit, merge both messages
# f or fixup -- combine into the previous commit, discard this message
# r or reword -- keep this commit but edit its message
# d or drop -- delete this commit entirely
Change the last three pick words to f (fixup), save and close the editor. Four commits become one clean commit with the first message. Then push with --force-with-lease.
- Create a branch and make four small commits with bad messages like "wip", "test", "asdf", "ok".
- Run
git lgto see the four commits. - Run
git rebase -i HEAD~4. - Change the second, third, and fourth entries from
picktof. - Save and close. Run
git lgagain. Four commits are now one.
stash
You are in the middle of building something when you need to switch to a different branch to fix a bug. Your current work is not ready to commit. Stash saves your in-progress changes temporarily so you can switch without losing anything.
$ git stash push -m "half-done login form" # save with a descriptive name
$ git stash # save with no name (harder to remember)
$ git stash -u # also stash untracked files
$ git stash list # see everything currently stashed
$ git stash pop # apply the most recent stash and delete it
$ git stash apply stash@{2} # apply a specific stash but keep it in the list
$ git stash drop stash@{0} # delete a specific stash
$ git stash clear # delete every stash
Stash works like a stack. stash@{0} is always the most recently stashed item. stash@{1} is the one before that. Always use -m to give your stash a name if you plan to have more than one. An unnamed list of five stashes becomes impossible to navigate quickly.
- Edit a file in your practice repo without committing.
- Run
git stash push -m "work in progress". - Run
git status. Your working directory is now clean. - Switch to another branch, do something, switch back.
- Run
git stash pop. Your changes are back.
undoing things
This is where a lot of people get anxious because mistakes feel permanent. They mostly are not. Here is the full map of undo operations:
| Situation | Command | Safe? |
|---|---|---|
| unstage a file, keep changes on disk | git restore --staged <file> | yes |
| discard all working directory changes to a file | git restore <file> | destructive, no undo |
| fix the last commit message | git commit --amend -m "new message" | local only |
| add a forgotten file to the last commit | git add file && git commit --amend --no-edit | local only |
| undo last commit, keep changes staged | git reset --soft HEAD~1 | local only |
| undo last commit, keep changes unstaged | git reset HEAD~1 | local only |
| undo last commit, throw away all changes | git reset --hard HEAD~1 | destructive |
| undo a commit already pushed to a shared branch | git revert abc1234 | yes, always safe |
The key distinction to understand:
git reset moves the branch pointer backwards, erasing commits from history. Safe only on local commits you have not pushed anywhere. If you reset past a commit that already exists on a shared remote, you will have a very bad time the next time you try to push.
git revert creates a brand new commit that is the exact inverse of the target commit. History stays intact. It is the always-safe option for undoing anything that has already been pushed to a shared branch.
--amend replaces the last commit with a new commit object. This changes the commit hash. Do not amend commits that are already on a shared branch, for the same reason as force pushing.
reflog: the real safety net
Here is something most people do not know: git almost never actually deletes anything. Even after git reset --hard, your work is still sitting in git’s internal object store for about 30 days before garbage collection runs.
Every time HEAD moves (commit, checkout, merge, rebase, reset, anything) git logs it in the reflog. You can always look back and find what you had.
$ git reflog
abc1234 HEAD@{0}: reset: moving to HEAD~2
9f3a1ec HEAD@{1}: commit: add login validation
3b7d2f1 HEAD@{2}: commit: add login form
# scenario: you ran "git reset --hard HEAD~2" by accident # your commits are still visible in the reflog at HEAD@{1} and HEAD@{2} # just reset forward to where you were
$ git reset --hard 9f3a1ec
# scenario: you deleted a branch and want it back
$ git reflog | grep feature/deleted-branch
$ git branch feature/deleted-branch 9f3a1ec # recreate it at that commit
When something goes wrong, git reflog is the first thing to run before doing anything else. The hash you need is almost always in there. This single command has saved countless hours of work for developers who thought they had destroyed everything.
common situations you will actually hit
you committed to the wrong branch
$ git reset HEAD~1
# now create the right branch and commit there
$ git switch -c feature/thing
$ git add . && git commit -m "your message"
# if you already pushed to main and need to undo that push too:
$ git push origin main --force-with-lease
push rejected because the remote has commits you do not have
error: Updates were rejected because the remote contains work that you do
not have locally. Integrate the remote changes before pushing again.
# this means someone else (or you from another machine) pushed something # you need to pull their changes first, then push yours
$ git pull --rebase origin main
$ git push origin main
detached HEAD state
This sounds alarming but it is not a disaster. You land in detached HEAD state when you check out a specific commit hash directly instead of a branch name. HEAD is pointing at a commit instead of at a branch.
$ git checkout abc1234
You are in 'detached HEAD' state. You can look around, make experimental
changes and commit them, and you can discard any commits you make in this
state without impacting any branches by switching back to a branch.
# if you just wanted to look at an old commit and do not plan to make changes:
$ git switch main # go back, nothing was lost or changed
# if you made commits here that you want to keep:
$ git switch -c my-new-branch # create a branch at your current position first # now those commits are attached to something permanent
Commits you make in detached HEAD state are not deleted when you switch away. They just become unreachable by any branch. Creating a branch immediately saves them. If you switch away without creating a branch, they will eventually be cleaned up by garbage collection, but you can still recover them with git reflog for a while.
your branch is so far behind main that rebasing creates a nightmare of conflicts
$ git log --oneline main..feature/my-thing
# strategy: start fresh from updated main, then cherry-pick only your commits
$ git switch main && git pull
$ git switch -c feature/my-thing-v2
$ git cherry-pick abc1234 def5678 # your commit hashes from the log above
finding when a bug was introduced
$ git show abc1234:src/app.js # see a file exactly as it was at a specific commit
$ git log -S "someFunction" # find when that function appeared or disappeared
$ git blame src/app.js # see who last changed every single line of a file
cherry-pick
Cherry-pick takes one specific commit from anywhere in your history and applies it to your current branch. The most common scenario: a bug fix was committed to a feature branch but you need it on main right now without merging the whole feature.
$ git cherry-pick abc1234 # apply one commit to current branch
$ git cherry-pick abc1234 def5678 # apply multiple commits in order
$ git cherry-pick abc1234 --no-commit # apply the changes but do not auto-commit # lets you review or modify before committing
Cherry-pick creates a new commit with the same changes but a different hash. The original commit stays exactly where it was. You are copying the changes, not moving the commit.
git bisect
You know the code worked at some point last month, and it is broken now. There are 50 commits between then and now. You could check each one manually, or you could let git do a binary search.
Binary search works like this: start at the middle. If the bug is there, the culprit is in the first half. If it is not there, the culprit is in the second half. Repeat with the relevant half. Each step eliminates half the remaining options.
$ git bisect start
$ git bisect bad # tell git the current commit is broken
$ git bisect good v1.0.0 # tell git this earlier commit was working
# git now checks out the commit halfway between those two points # you test your code manually
$ git bisect good # if it works at this midpoint
$ git bisect bad # if it is still broken
# repeat this test-and-tell cycle # git narrows down until it names the exact commit that introduced the bug
$ git bisect reset # return to your original branch when done
50 commits takes about 6 steps to narrow down. 100 commits takes 7 steps. This is one of those features that feels like magic the first time you use it.
tags
Tags are named pointers to specific commits. Unlike branches, they do not move when you add new commits. They are used to mark release versions.
$ git tag -a v1.0.0 -m "first stable release" # annotated tag with a message
$ git tag # list all tags
$ git push origin v1.0.0 # push one specific tag
$ git push origin --tags # push all tags at once
$ git tag -d v1.0.0 # delete a tag locally
$ git push origin --delete v1.0.0 # delete a tag from remote
Use annotated tags (with -a) for releases rather than lightweight tags. Annotated tags store the tagger’s name, the date, and the message. GitHub automatically generates a Releases section on your repo page from annotated tags.
github: the interface side
issues
Issues are GitHub’s built-in task and bug tracker. Before writing any code to contribute to an open source project, search the issues first to see if someone is already working on it or if the maintainers have already decided they do not want it. Opening an issue before writing code and waiting for a response is considered good practice. A lot of first-time contributors spend hours on a PR that gets immediately closed because the maintainers specifically do not want that feature.
code review
On the Files Changed tab of any pull request, click any line number to leave an inline comment on that specific line. When you finish reviewing, you pick one of three options:
- Comment: general feedback, no approval or block
- Approve: this is ready to merge
- Request Changes: something needs to be fixed before this should merge (blocks the PR until the author updates it and you re-review)
branch protection rules
Under Settings > Branches on GitHub, repo admins can configure rules for protected branches. Common settings include:
- Require at least one approval before merging
- Require all CI checks to pass
- Block force pushes to main
- Require branches to be up to date before merging
Any serious project has these enabled. This means nobody, not even the owner, can accidentally push broken code directly to main.
github actions (CI/CD)
GitHub Actions lets you run automated tasks whenever certain things happen in your repo, like a push or a new pull request. You write the configuration in a YAML file inside .github/workflows/:
name: Run Tests
on: [push, pull_request]
jobs:
test:
runs-on: ubuntu-latest
steps:
- uses: actions/checkout@v4
- uses: actions/setup-node@v4
with:
node-version: '20'
- run: npm install
- run: npm test
With this file in place, every push and every pull request will automatically run your tests. The PR page shows a green checkmark or red X. Set branch protection to require this check and broken code cannot be merged, no matter who submits it.
the team workflow (how real projects operate)
Most teams, from two people to hundreds, follow a workflow called GitHub Flow:
mainis always deployable. Every commit on main works. Nobody pushes directly to it.- All work happens on feature branches with descriptive names.
- When the work is ready, open a pull request.
- One or more teammates review it, leave comments, and approve or request changes.
- Once approved and all checks pass, it gets merged into main.
- The feature branch gets deleted.
- Deployment happens automatically from main via GitHub Actions.
This is not complicated, but it is the thing that makes teams actually function without stepping on each other constantly.
There is a more elaborate model called Gitflow that adds dedicated develop, release, and hotfix branches. It exists for products that ship fixed versioned releases on a schedule, like mobile apps with an App Store review process. For web apps and most modern projects, GitHub Flow is simpler and sufficient.
daily work
branches
remotes + forks
undo and recover
investigate
advanced
- I understand the three areas (working directory, staging, repository) and why a file can appear in two at once
- I can create branches, switch between them, merge them, and delete them confidently
- I can read conflict markers, resolve merge conflicts, and know how to abort if needed
- I know what origin and upstream mean and can set them up from scratch
- I can fork a repo, add upstream, sync it, create a branch, and open a pull request
- I know the difference between fetch, pull, and pull --rebase and when to use each
- I can rebase a feature branch onto main and clean up commits with interactive rebase
- I know when to use reset vs revert and understand why the difference matters for shared branches
- I know how to use reflog to recover things that looked permanently deleted
- Detached HEAD state does not scare me anymore and I know exactly how to handle it